Michael Heilemann, The Norseman / The Viking — Field notes from the disk revival project: Apple II archiving
Before any of the validation or repair work in this series matters, you need bits off the physical disk in the first place. That sounds trivial until you remember what you're asking a 40-year-old computer to do: talk to a modern PC that has no floppy controller, no cassette port driver, and no idea what a Disk II is. The bridge between those two worlds is ADT Pro, and getting it running reliably is its own small project.
This is exactly what's sitting on my desk, because "get an Apple ][ talking to a PC" undersells how many small decisions go into a setup that's fast and reliable rather than merely functional.
-=[ THE APPLE II SIDE ]=-
The host machine is an unenhanced Apple ][e. ADT Pro doesn't need the enhancements, and part of the appeal of this whole project is that none of the machinery involved is exotic. If your ][e can run ProDOS and boot a disk, it can do this.
For the disk drives, I'm running two: a genuine Apple Disk II, and a Cumana clone drive, each on its own controller card. That's a deliberate choice, and it matters more in the next post about capture workflow. Short version: having two physically distinct drives means a marginal read on one drive isn't the same failure mode as a marginal read on the other, which makes cross-checking a re-read against a different drive meaningful evidence, not just running the same fallible hardware twice.
-=[ GETTING A BOOT DISK WITHOUT A BOOT DISK ]=-
ADT Pro needs to boot from something on the Apple ][ side before it can talk to the PC at all, and normally that means keeping a physical ADT Pro boot floppy around and reusing it constantly. I'm booting ADT Pro off a BMOW Floppy Emu, which emulates a Disk II (and a few other Apple disk formats) off an SD card. The Emu holds disk images instead of magnetic media, so the ADT Pro boot disk just gets selected and I boot to ADT Pro directly with no fussing about trying to make an Apple Boot disk through the audio/cassette port route. I have tried this multiple times in the past and spent hours getting nowhere.
There is a way to get a physical copy if you actually wanted one: boot the Apple II to a copy program off the Emulator, swap the Emu's image over to the ADT Pro disk, and copy that to a real floppy in the Disk II. It works, but it's a needless detour when the Emu can just present the ADT Pro image directly and skip the physical disk entirely.
-=[ BOOTSTRAPPING ADT PRO OVER AUDIO ]=-
Partway through the archiving, the Floppy Emu stopped working. Luckily it was still under warranty and I just sent it back to be replaced (Thanks Steve!). No boot disk on it, no physical ADT Pro disk sitting around either, because the whole point of the Emu was that I'd never needed to make one. Which left me with an Apple ][e and no way to get anything onto it at all other than the disks on hand I was archiving.
The fallback is the method ADT Pro was originally built around: the audio, or cassette-port, transfer. It's the slow path I'd avoided setting up the first time around, and it does have a real cost, a full transfer takes minutes instead of seconds. But it needs nothing more exotic than 2 audio cables and a USB sound card, and unlike the serial chain, it doesn't depend on the Emu, a seriALL card, or anything I'd just lost. I picked up a cheap USB audio card and the right cables from Amazon to get a clean line into the cassette port, and got ADT Pro 2.1.0's audio transfer working end to end the first time around this time. Make sure that you set your speaker volume to about 60%.
ADT Pro has a bootstrapping option specifically for this situation: a machine with nothing useful on it yet. Run it, and ADT Pro sends ProDOS itself over the audio link, byte by byte, into the Apple II's memory, no disk required on the receiving end at all. That's the whole trick, you don't need a bootable disk to get ADT Pro running, you need ADT Pro to hand you one.
- Bootstrap ProDOS over audio. With the audio cable and USB sound card wired up and ADT Pro's server running on the PC side, the bootstrap option loads ProDOS directly into the Apple II's RAM over the cassette port. No disk in either drive yet.
- Upload the ADT Pro Serial Client. Once ProDOS is running, the same audio link brings over the ADT Pro Serial Client, the piece of software that actually talks ADT Pro's protocol from the Apple II side. Optionally you can send the audio client and transfer disks via that method, but it takes a lot longer, and I think it is more error prone.
- Format a disk. With ProDOS up and the ADT Pro client loaded, format a blank floppy in one of the drives, this becomes the disk that'll carry everything going forward.
- Receive the ADT Pro boot disk image, and write it. Switch to receiving in ADT Pro, pull down the actual ADT Pro disk image, and write it to the freshly formatted floppy. That disk boots ADT Pro on its own from then on. Make sure you have the ADT Pro.dsk file in the ADT Pro working directory so the Apple ][ can request it.
That's the whole bootstrap: audio gets you from nothing to a working ProDOS system, ProDOS plus the Serial Client or Audio Client gets you a live link to the PC, and that link gets you a real, bootable ADT Pro disk you can put in a drive like any other. Once that disk existed, I was back in business, and the digital archiving of the collection kept moving.
Why this is worth writing down: the whole reason the Floppy Emu mattered in the first place was to avoid the audio/cassette path entirely, which I'd never gotten working before this happened. Being forced into it turned out to be useful: it's a real fallback, not just a slower version of the same thing, and it's the one path that doesn't depend on any single piece of hardware surviving. If the Emu, the seriALL card, or anything else in the serial chain goes down again, audio bootstrap is how the whole pipeline gets back on its feet from absolutely nothing.
-=[ THE SERIAL LINK ]=-
ADT Pro can transfer over audio cable (the classic, slow, cassette-port method) or over serial, which is dramatically faster and more reliable. I'm using serial, through a Practical Peripherals seriALL card in Slot 2 of the ][e. A period-correct-enough serial card that ADT Pro talks to directly. The seriALL identifies itself as a Super Serial Card (SSC), not a generic serial card, which matters for compatibility with ADT Pro and other vintage software that looks for that specific signature.
From there, the physical cabling is:
- A StarTech 10ft DB9-to-DB25 null modem cable (female to male) running from the seriALL card's DB25 port over to the PC side.
- A USB-to-RS232 adapter with an FTDI chipset on the PC end, converting that DB9 serial connection into a USB port the modern machine has.
The FTDI chipset detail isn't a throwaway spec. Cheap USB-serial adapters built on other chipsets (unbranded PL2303 clones) are a well-known source of flaky, drop-prone serial transfers, exactly the kind of intermittent corruption this whole project is trying to detect and repair on the Windows PC side. The last thing you want is your PC-side USB adapter quietly introducing its own transmission errors into a transfer you're about to trust as your "clean" capture. FTDI chips have a deserved reputation for behaving themselves, and after enough transfers to trust the number, I haven't seen a serial-link-attributable error yet.
Why serial over audio: the audio-cable method works on any Apple II with zero extra hardware, which matters if you don't have a spare card slot. But it's slow. A full 140K disk can take several minutes, and it's sensitive to cable quality and volume levels. With a whole box of disks to get through, serial's speed and reliability pay for the card within the first afternoon.
-=[ CONFIRMED WORKING SERIALL CONFIGURATION ]=-
I went looking for anyone who'd documented a seriALL card working with ADT Pro before setting this up, since it's a period-correct enough clone that I expected some crossover with the well-worn Super Serial Card threads. I couldn't find a single case: no forum post, no wiki entry, nothing. So for anyone else with one of these cards sitting in a box, here's a configuration that works, tested on ADT Pro 2.1.
- Card slot: Slot 2.
- PC side (ADT Pro server): COM3 at 115200 baud. Unlike a Super Serial Card, ADT Pro 2.1 doesn't show a "comms device" or card-type selector for this setup, even from the serial configuration screen, there's just the port and the baud rate.
- Apple II side: No handoff sequence. With a Super Serial Card, you'd normally type IN#2, then Ctrl-A and a speed code, before ADT Pro takes over. With the seriALL, there's none of that: I boot straight into ADT Pro (from the Floppy Emu) and select Serial from the menu, and it connects.
- DIP switches: Upper switch block: 1 1 0 0 0 0 0 0. Lower switch block: 1 1 1 1 0 0 1 0, with the jumper set to position 5 at the bottom of the card.
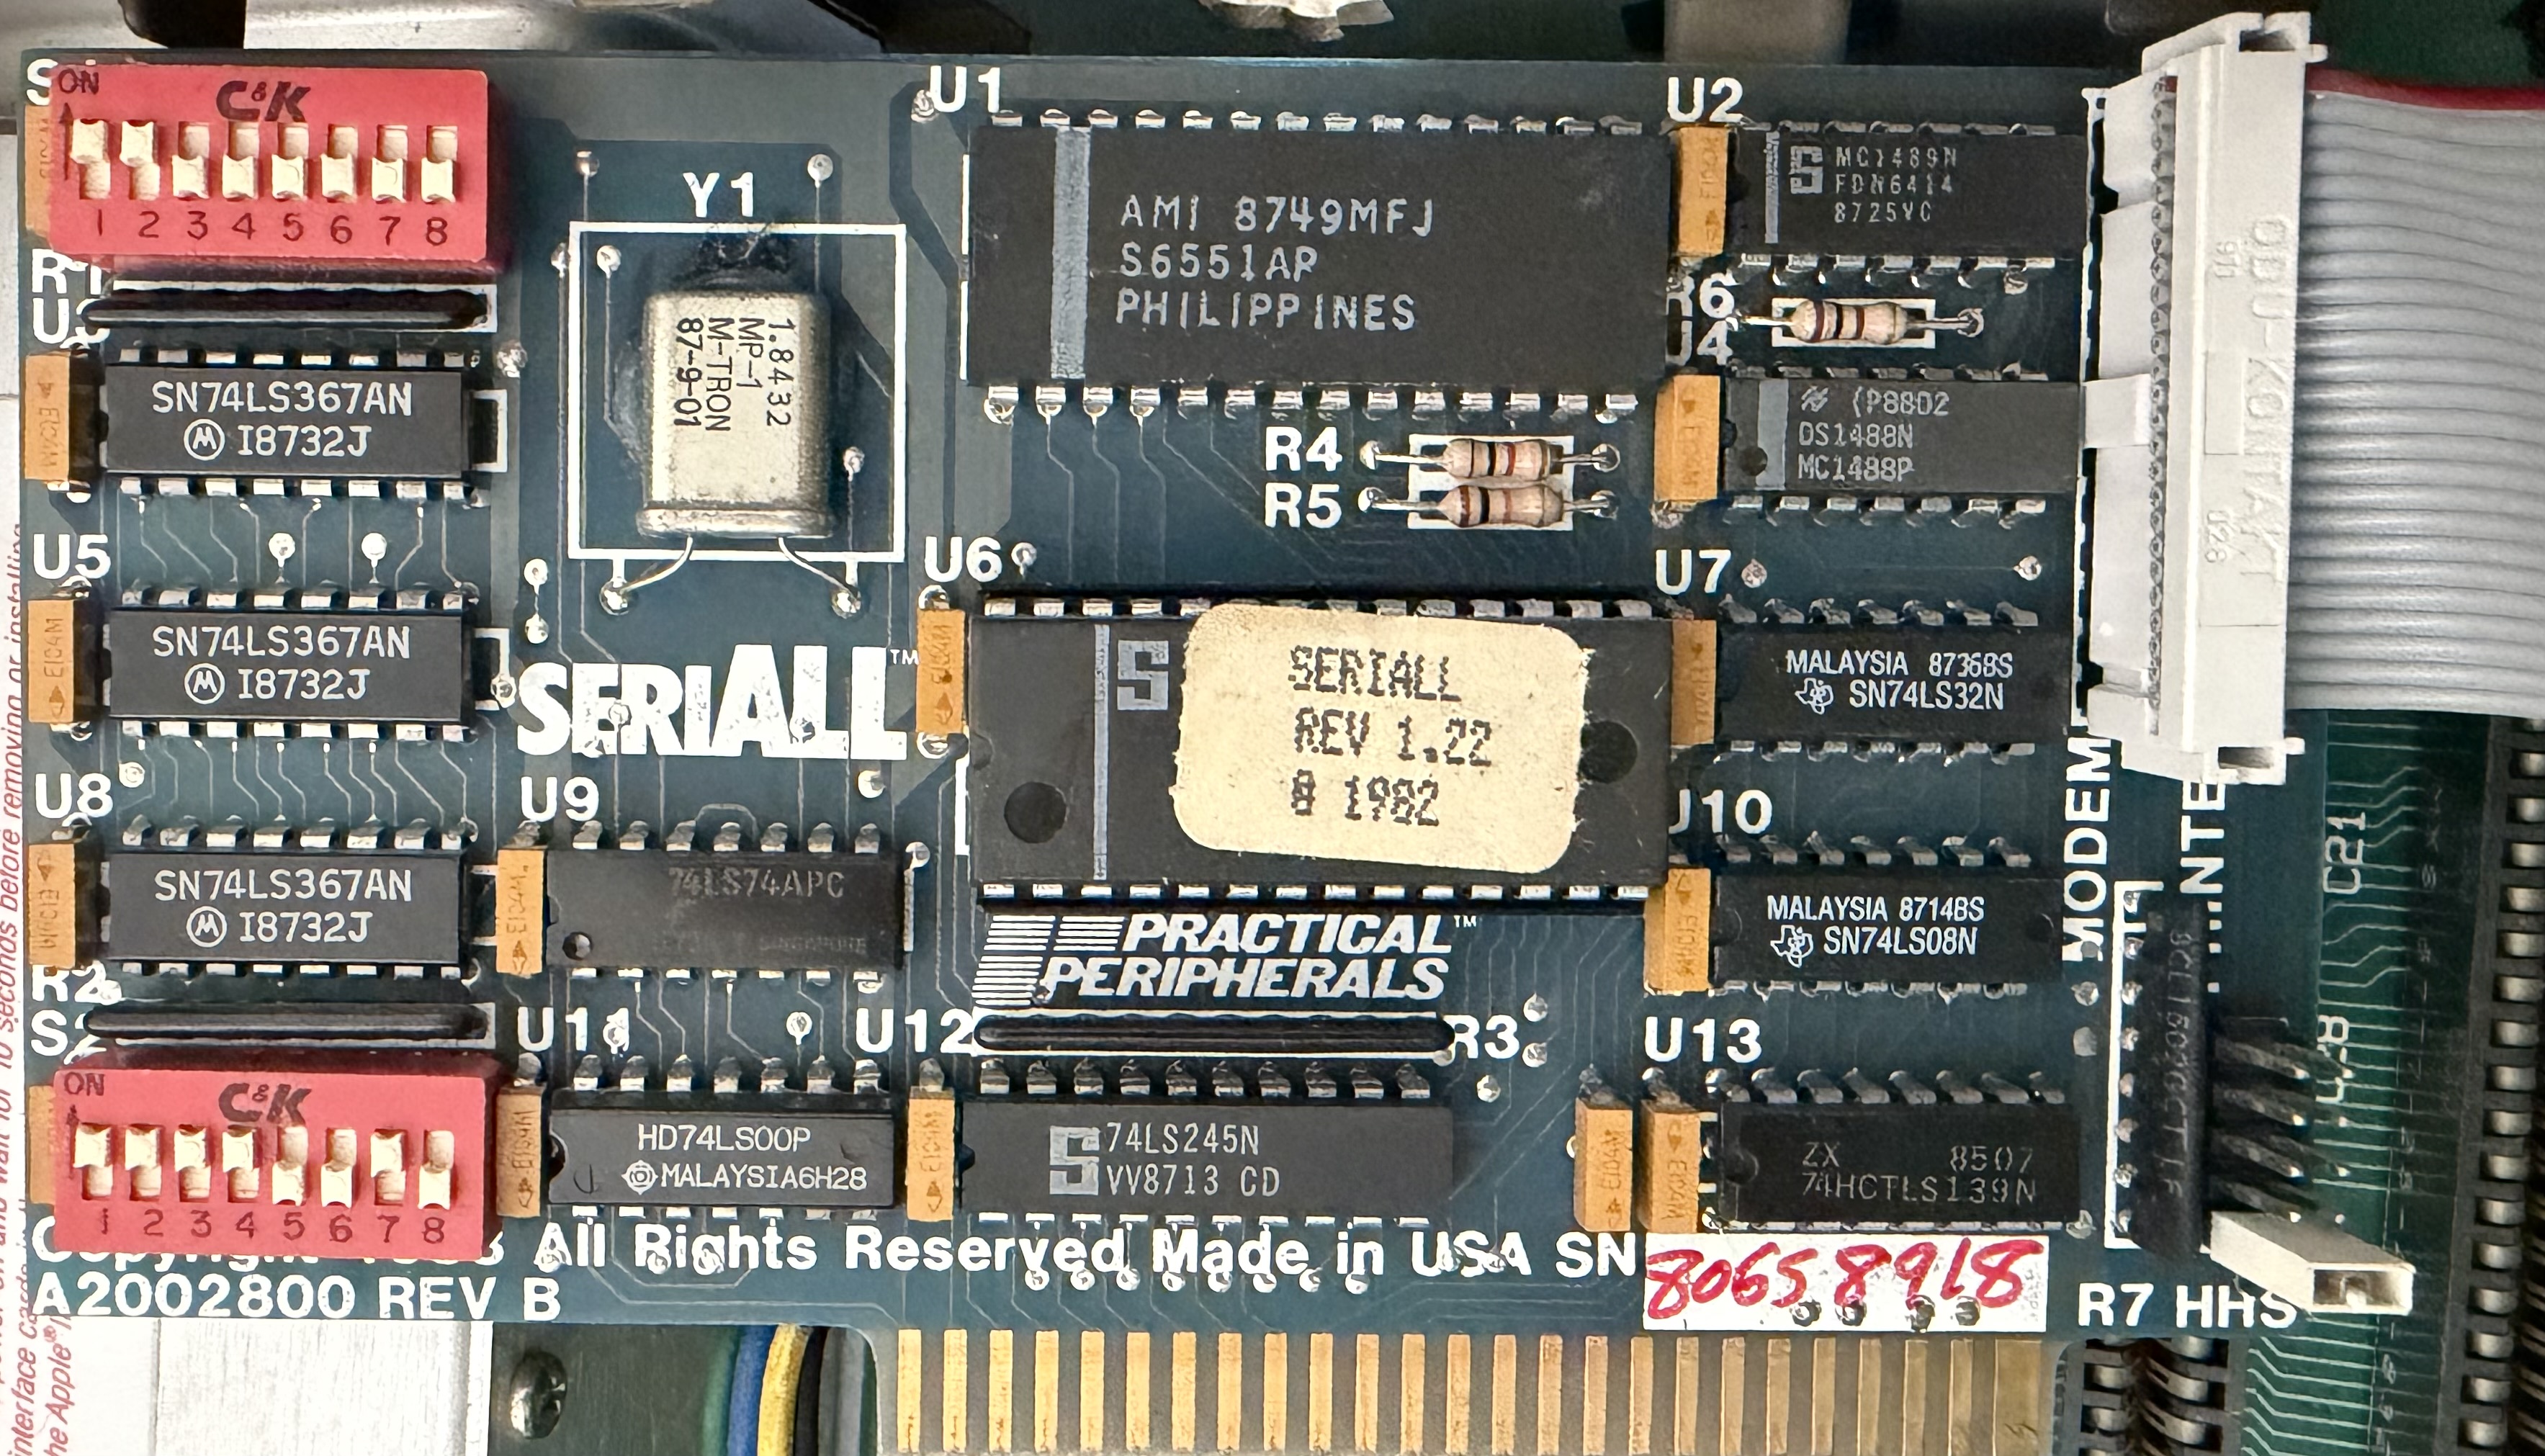
That's one working setup, not a full map of the card's options, if you're running a seriALL card and land on a different configuration, I'd like to hear about it.
-=[ APPLE ][ ADT PRO CONFIGURATION ]=-
Once the seriALL card is installed, boot ADT Pro, Select S)erial, then go to the C)onfiguration menu to make sure things are setup so the software knows to know how to find it. The configuration settings are straightforward but worth documenting:
- COMMS DEVICE: SSC Slot 2 (This is the usual slot for Apple ][ serial cards)
- BAUD RATE: 115200
- BLOCKS AT ONCE: 2
- ENABLE SOUND: Yes (useful feedback during transfers)
- ENABLE NIBBLES: Yes (Needed if you're copying protected disks. This gives you the option to use Nibble mode or Standard when you start to send the disks)
- SAVE CONFIG: No (unless you want ADT Pro to remember these settings on next boot)
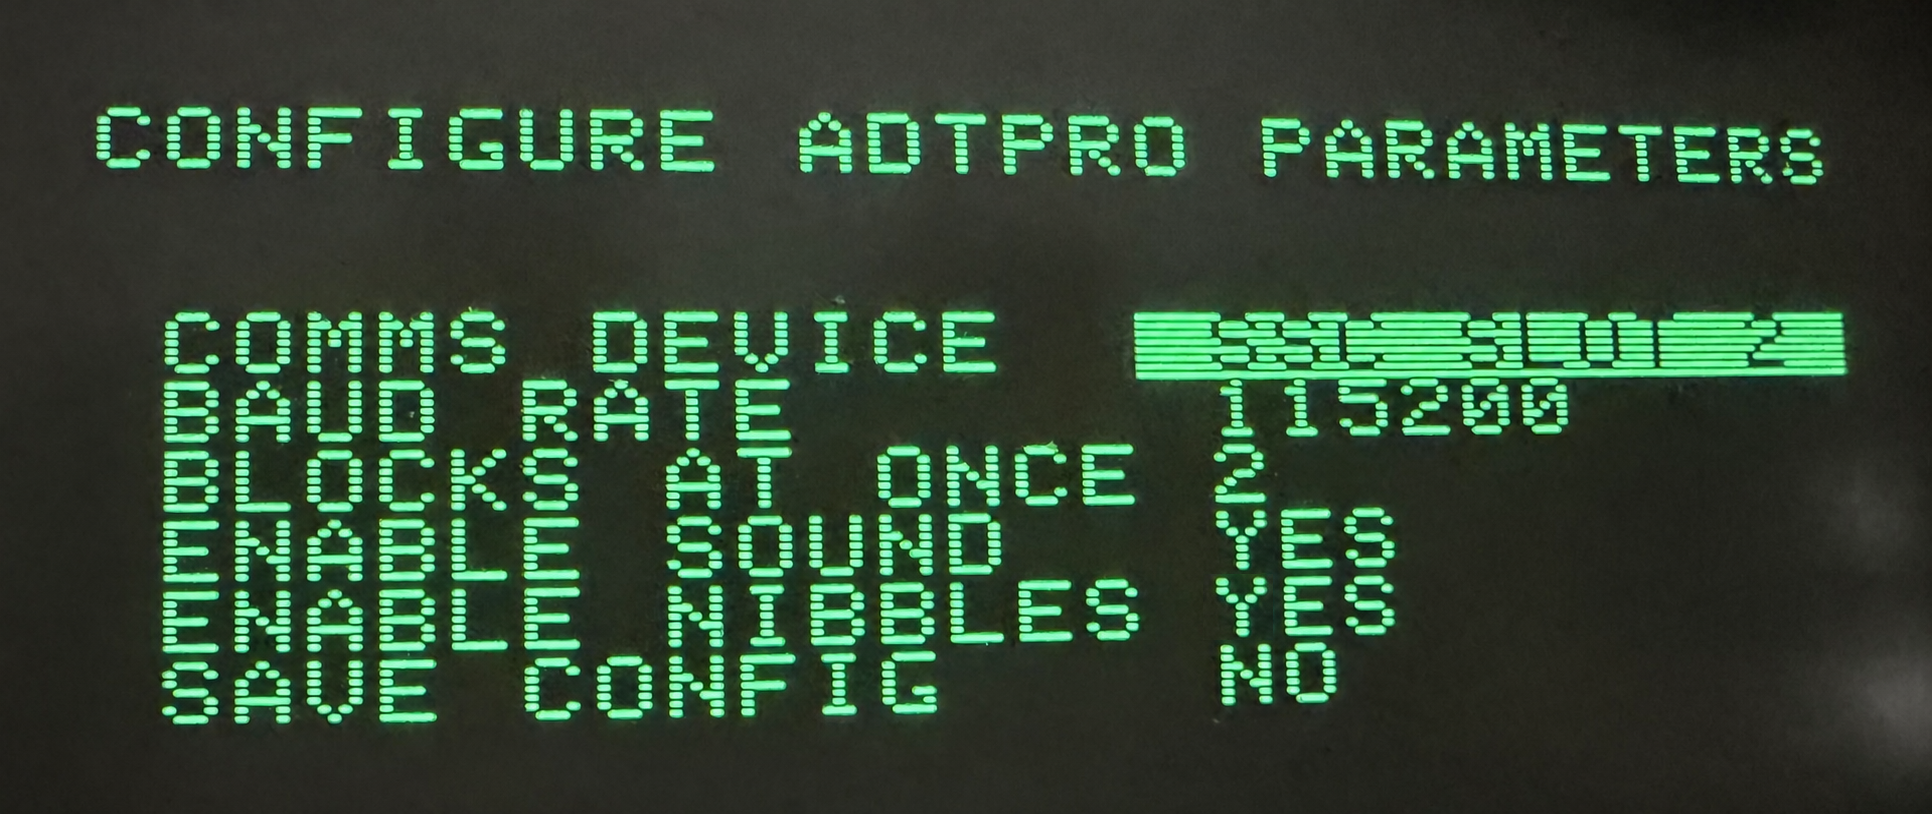
The nibbles setting deserves special attention. If your collection includes protected disks, enabling nibbles gives you the flexibility to switch between standard sector-by-sector mode and nibble mode at transfer time, depending on what the disk demands. A protected disk that won't read cleanly in standard mode might yield better results in nibble mode, capturing the raw magnetic patterns that make the protection work.
-=[ CALIBRATE AND CLEAN BEFORE YOU USE THE DRIVE ]=-
Both drives get a real maintenance pass before they touch anything from the actual collection, not just a glance to see if they spin. A few decades of storage is not kind to drive belts, lubricant, or head alignment, and a drive that's drifted out of spec can produce exactly the kind of intermittent, marginal reads this whole series is built around detecting, on media that didn't need to be at risk in the first place.
- Head cleaning. A standard wet-cleaning kit disk (or isopropyl alcohol and a lint-free swab on the actual head, if you're comfortable opening the drive) before the first session and periodically afterward. Oxide buildup on the head is one of the most common causes of a read that's fine on one pass and garbled on the next, precisely the failure mode the calibrated multi-read capture in the next post is designed to catch, so it pays to rule out a hardware cause first rather than papering over it with more re-reads forever.
- Rail cleaning and lubrication. The metal rails the head assembly rides on accumulate old, gummed-up lubricant and dust over the years. A dry or sticky rail makes head movement inconsistent from seek to seek, which shows up as track-dependent read failures that can look exactly like media damage if you don't know to suspect the drive itself.
- Speed and alignment check. A drive running noticeably off 300 RPM, or with a head that's drifted out of azimuth alignment, will read a healthy disk inconsistently. If you have access to an alignment diagnostic disk, run it on both drives before trusting either one. If not, the System Master round-trip test above is a reasonable substitute; a drive that's badly out of alignment usually can't get a clean round-trip on a disk it just wrote itself.
Note: I did not do an alignment on the drive that came with the system as it is likely the one that wrote the disks so should be aligned for those disks already. I did adjust the speed of the drive as it was running slow when I tested it.
Do this before, not after: it's tempting to skip straight to imaging the collection and only go back to clean heads once something looks wrong. Resist that. A dirty head or a gummed-up rail doesn't just risk a bad read. Repeatedly seating and reading a fragile original disk on a drive that isn't in good condition is itself a source of wear on media you can't get back. Get both drives clean, aligned, and validated against a disposable test disk first. The real collection should only be inserted in a drive that is trustworthy.
-=[ TEST THE CHAIN WITH A GOOD DISK ]=-
This is the step I'd push hardest on if you're setting up something like this for the first time. Before you feed it a single disk from the actual collection, run the whole pipeline (drive, controller, seriALL card, null modem cable, FTDI adapter, ADT Pro on both ends) against a disk whose correct contents you already know byte-for-byte. A blank, freshly formatted DOS 3.3 System Master is what I use, and the Floppy Emu makes it trivial to get one: write a known-good DOS 3.3 master image from the SD card out to a real floppy on the Disk II, then transfer that physical disk back through ADT Pro and compare what comes back against the source image.
The reason this matters: every post later in this series is built on the assumption that when a capture comes back looking damaged, the damage is coming from the physical media, not from something upstream of it. A marginal cable, a serial adapter having a bad day, a drive head not clean. A System Master round-trip test collapses that whole chain of maybes into one clean yes or no. If a disk you just wrote yourself, from a known-good image, doesn't come back identical, you've found a hardware problem before it had the chance to masquerade as corruption on an irreplaceable disk from the collection.
Repeat this periodically, not just once at setup. Do it again any time you change something in the chain. Try a different disk, USB port, cable after cleaning a drive (see below), and treat a clean round-trip as the gate that has to pass before real disks go into the drive.
-=[ WHAT "SET UP" MEANS HERE ]=-
None of this hardware list is interesting on its own. It's a fairly standard ADT Pro rig, and there are other valid ways to build one (audio cable, Uthernet II over TCP/IP, a different serial card). What matters for the rest of this series is that it's stable and verified: the same known-good chain, disk after disk, tested against a disk you can afford to be wrong about, so that when a capture from the real collection comes back looking wrong, the validation pipeline in later posts can trust that the wrongness is coming from the disk, not from a flaky adapter, or an unclean drive.
Next up: now that bits can reliably get from the disk to the PC, why a single pass through that pipeline still isn't enough, and what "capturing a disk" means once you start treating each read as one data point instead of the final answer.
Fair winds and following seas,
The Norseman